 Pin it
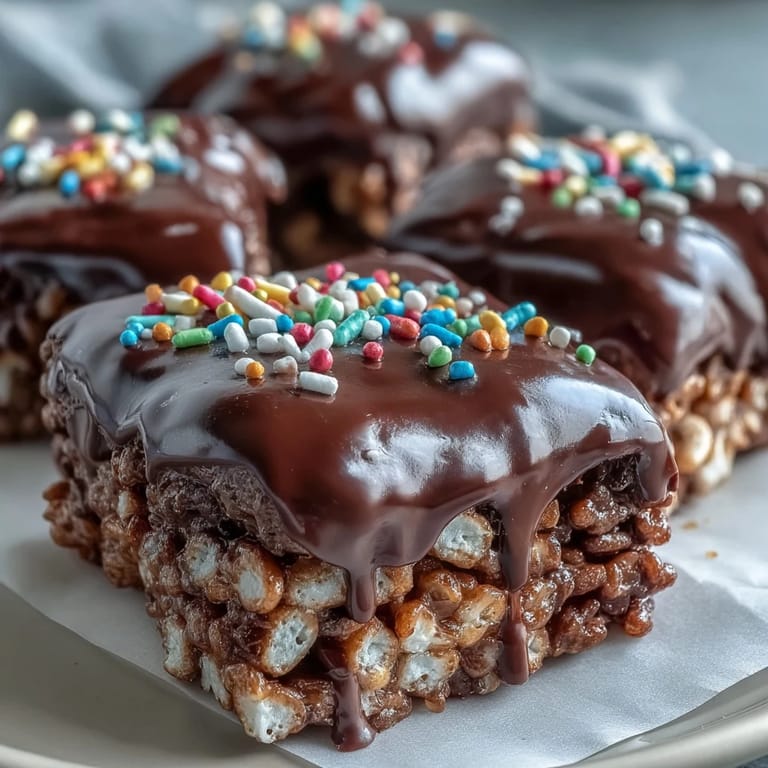
 My neighbor knocked on the door one Saturday afternoon with a plate of these chocolate-covered Rice Krispie treats, still warm from her kitchen, and I understood immediately why she'd been grinning all morning. The crispy cereal snaps between your teeth, then melts into marshmallow sweetness, all wrapped up in a shell of glossy chocolate that catches the light. I made a batch that same evening, and somehow a dozen bars disappeared before dinner. Now whenever I need something that feels like both celebration and comfort, these are what I reach for.
I'll never forget bringing these to a potluck where everyone was expecting something fancy, only to watch people return to the dessert table three and four times just for another bar. One friend confessed she'd eaten half the pan in the car on the drive home, then felt both guilty and delighted. That's when I realized these treats had crossed from simple snack into something people genuinely crave.
Ingredients
- Unsalted butter (6 tablespoons, plus extra for greasing): This is your base for melting the marshmallows, and using unsalted lets you control the saltiness—I learned this after an overly salty batch made everything taste metallic.
- Mini marshmallows (10-ounce package): They melt faster and distribute more evenly than large ones, creating that gooey binding that holds everything together.
- Rice Krispies cereal (6 cups): The classic choice for good reason—it stays crispy inside even after the chocolate sets, which is the whole point.
- Fine sea salt (¼ teaspoon, optional): Just a whisper of salt makes the sweetness pop and balances the richness of the chocolate.
- Semisweet or dark chocolate chips (1 ½ cups): Choose what you genuinely enjoy eating, because that's what you're going to taste here—no hiding mediocre chocolate under layers of other things.
- Vegetable or coconut oil (1 teaspoon): This keeps the chocolate fluid and glossy instead of thick and dull, a trick I picked up from watching a pastry chef work.
- Rainbow sprinkles or chopped nuts (2 tablespoons, optional): This is pure joy in garnish form, and the only thing stopping you is your imagination.
Tired of Takeout? 🥡
Get 10 meals you can make faster than delivery arrives. Seriously.
One email. No spam. Unsubscribe anytime.
Instructions
- Prepare your pan:
- Lightly butter an 8x8 or 9x9-inch square baking pan so the mixture slides out easily later. I once skipped this step and spent ten minutes scraping treats off the sides—never again.
- Melt the butter gently:
- In a large saucepan over low heat, stir the butter constantly so it melts smooth and golden without browning. Watch it carefully, because even low heat can sneak up on you if you're distracted.
- Add and fold in the marshmallows:
- Once the butter is melted, add all the mini marshmallows and keep stirring until they disappear into a glossy, thick mixture. This takes about three to four minutes, and the smell alone will make you happy you started cooking.
- Season and combine with cereal:
- Stir in the salt if you're using it, then remove from heat and gently fold in the Rice Krispies using a spatula. You want everything evenly coated without crushing the cereal into dust.
- Press into the pan:
- Transfer the warm mixture to your prepared pan and use a buttered spatula or your hands to press it firmly and evenly across the bottom. Don't be shy—you want it compressed enough to hold together when you cut it.
- Let it rest briefly:
- Leave it at room temperature for about ten minutes so it firms up just enough to handle the chocolate without falling apart.
- Melt the chocolate perfectly:
- In a microwave-safe bowl, combine your chocolate chips with the oil and microwave on medium power in 30-second bursts, stirring after each interval until smooth and glossy. Overheating chocolate turns it grainy and bitter, so patience here actually matters.
- Coat with chocolate:
- Pour the melted chocolate over the cooled Rice Krispie layer and spread it evenly with an offset spatula or the back of a spoon. Work quickly but not frantically—you have more time than you think.
- Garnish right away:
- Sprinkle your toppings over the chocolate while it's still wet so they stick beautifully. This moment is pure satisfaction.
- Set and cut:
- Let everything rest at room temperature for at least an hour, or speed things up by refrigerating for 20 to 30 minutes until the chocolate is completely firm. Once set, cut into 12 to 16 bars with a sharp knife, wiping the blade between cuts for clean edges.
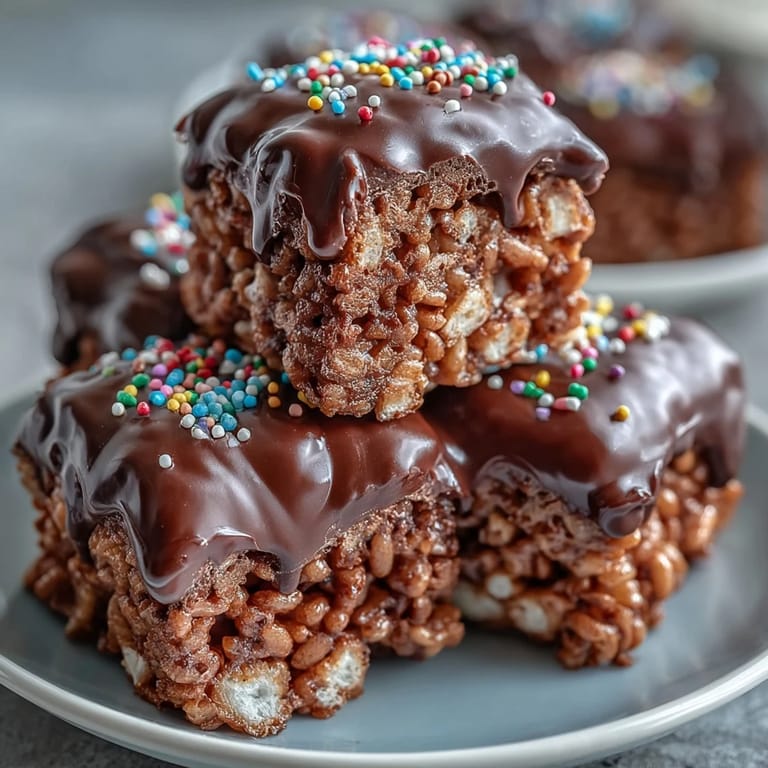
 Pin it
 My daughter declared these "the best thing you've ever made" after her first bite, which probably says more about her than my cooking skills, but I'll take it. Watching someone genuinely enjoy something you made—without overthinking it, without waiting for the right occasion—is what cooking is really about.
Storage and Keeping Them Fresh
These treats stay best in an airtight container at room temperature for up to three days, though I've never had to store them that long because they vanish first. If you do manage to keep some around, the fridge will preserve them for a week, but the chocolate gets a bit more brittle and the cereal loses some of its snap. I've learned that the first two days are when they're at their absolute peak—the chocolate is silky, everything has the right texture, and life is good.
Variations That Keep Things Interesting
The beauty of this recipe is how easily you can shift it depending on mood or occasion. White chocolate and pastel sprinkles look stunning for spring celebrations, while dark chocolate with sea salt creates something more sophisticated. I once stirred ½ teaspoon of vanilla extract into the melted marshmallows, and the subtle flavor made everything taste a bit more refined without screaming about it.
Why These Always Disappear
These treats hit that perfect intersection of nostalgic and indulgent, familiar yet special enough to feel like a real treat. They're the kind of thing that makes people pause mid-conversation and ask for the recipe, or just quietly eat another one when they think no one's looking. The magic is partly the textures, partly the combination of flavors, but mostly it's that they're made with actual care instead of shortcuts.
- Make sure your pan is truly buttered, or the whole block will stick and tear when you try to remove it.
- If you don't have mini marshmallows, you can use regular ones cut into quarters, though it takes longer to melt.
- Room temperature storage works fine unless you're in a hot climate—if your kitchen stays above 75°F, the chocolate will get soft, so refrigerate instead.
 Pin it
 These chocolate-covered Rice Krispie treats prove that simple ingredients, treated with respect, become something genuinely memorable. Make a batch this week and watch what happens.
Recipe Questions & Answers
- → How should I store these chocolate covered treats?
Keep them in an airtight container at room temperature for up to 3 days, or refrigerate for up to a week. The chocolate may develop a slight bloom from humidity but remains perfectly delicious.
- → Can I make these ahead of time?
Absolutely! These bars actually benefit from sitting overnight as the flavors meld together. Prepare them up to 24 hours before serving, though the sprinkles are best added within a few hours of serving to maintain their brightest appearance.
- → Why add oil to the melting chocolate?
The vegetable or coconut oil helps the chocolate melt smoothly and creates a glossy, pourable consistency that sets firmly but snaps when bitten. It also prevents the chocolate from seizing during the melting process.
- → Can I use different types of chocolate?
Yes! White chocolate creates a beautiful contrast with dark sprinkles, while milk chocolate offers a sweeter profile. For a sophisticated version, use bittersweet chocolate and top with toasted nuts or sea salt flakes instead of sprinkles.
- → Why do my treats turn out hard instead of crispy?
Pressing the mixture too firmly into the pan compacts the cereal too much. Use a light touch when spreading, and the bars will maintain their signature airy crunch. Also avoid overheating the marshmallows, which can make the final texture dense.