 Pin it
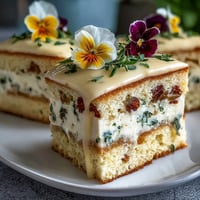
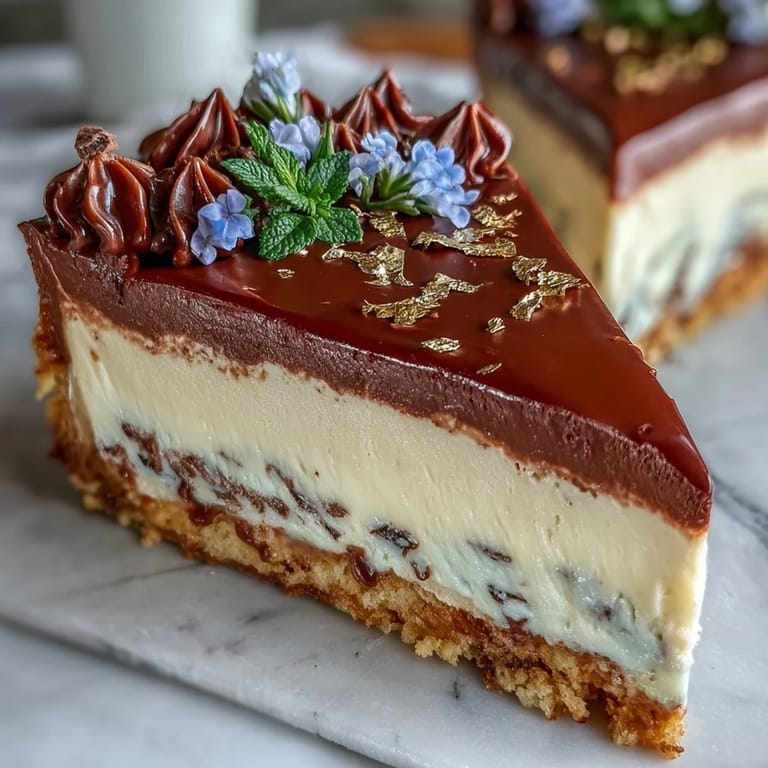
 My friend texted me a photo of her graduation cap mid-throw, and I knew exactly what I wanted to bake for her celebration dinner. There's something about a milestone that calls for a cake worthy of the moment, one that looks as accomplished as she felt walking across that stage. This floral and gold leaf design arrived in my kitchen almost by accident, born from watching how the afternoon light hit some edible flowers at the farmer's market and thinking they deserved to shine on something special. The vanilla sponge paired with Swiss meringue buttercream turned out to be exactly the elegant foundation I needed, sturdy enough to hold the weight of gold but delicate enough to melt on the tongue. When she saw it, she actually gasped.
I remember the kitchen smelling like butter and vanilla while my sister sat at the counter watching me press edible flowers onto the crumb coat, asking if I was nervous about ruining it. I wasn't, actually, which surprised me. There's something calming about decorating a cake once the structure is done—it's all intuition and placement at that point, no chemistry, no guessing if it's baked through. When my dad came home and saw those gold leaf accents catching the kitchen light, he actually pulled out his phone to photograph it before it got cut. That's when I knew this cake had become more than just dessert.
Ingredients
- All-purpose flour: Two and a half cups gives you structure without heaviness, the backbone of a cake that can actually hold layers without crumbling apart.
- Baking powder: Two and a half teaspoons ensures an even rise and that tender crumb that makes people close their eyes when they take a bite.
- Salt: Just a half teaspoon, but it's the secret that makes every other flavor sing louder.
- Unsalted butter: One cup, room temperature, because cold butter won't cream properly and warm butter creates a greasy mess.
- Granulated sugar: Two cups for the cake layers, because it aerates the butter and creates those fine air pockets that make the cake light.
- Large eggs: Four at room temperature, so they incorporate smoothly without breaking the emulsion you've worked to build.
- Vanilla extract: One tablespoon of pure vanilla, never the imitation stuff, because this cake deserves that floral complexity.
- Whole milk: One cup, alternated with the dry ingredients to create a tender crumb without overdeveloping the gluten.
- Egg whites: Five large ones for the buttercream, and they must be completely free of any yolk or the whole thing won't whip to peaks.
- Edible gold leaf sheets: These are your showstopper, and they're surprisingly affordable once you know where to look.
- Assorted edible flowers: Pansies, violets, and roses work beautifully, but make absolutely sure they're grown without pesticides and labeled specifically for eating.
- Food-safe paintbrush: This delicate tool is how you apply the gold leaf without fingerprints or damage.
Tired of Takeout? 🥡
Get 10 meals you can make faster than delivery arrives. Seriously.
One email. No spam. Unsubscribe anytime.
Instructions
- Set up your workspace:
- Preheat your oven to 350°F and prep three eight-inch round pans with parchment paper, because there's nothing worse than a cake that sticks. Have all your ingredients measured and ready before you start mixing, a habit that will save you from halfway revelations.
- Combine your dry ingredients:
- Whisk together the flour, baking powder, and salt in a separate bowl so the leavening is evenly distributed through every layer of cake. This takes ninety seconds and makes an enormous difference.
- Cream the butter and sugar:
- Beat them together for a full three minutes until the mixture is pale and fluffy, which means you've incorporated enough air to give the cake its structure. You'll see the color lighten and the texture become almost mousse-like, and that's exactly what you're after.
- Incorporate the eggs:
- Add them one at a time, beating well after each one goes in, because rushing this step can cause the mixture to separate and break. If it looks slightly curdled at any point, just keep beating and it will come back together.
- Alternate wet and dry:
- Starting with the flour mixture and ending with it, fold in the flour and milk in stages so you don't overmix and develop tough gluten. The batter should come together smoothly without any visible streaks of flour.
- Divide and bake:
- Pour the batter evenly among your prepared pans and smooth the tops with a spatula, then bake for 28 to 32 minutes until a toothpick comes out clean. The cakes should be golden on top and pull slightly away from the sides of the pan.
- Cool with patience:
- Let them rest in their pans for ten minutes so they firm up enough to turn out without breaking, then cool completely on wire racks. Warm cake will crumble when you frost it, so don't skip this step even though you're impatient.
- Make the meringue buttercream:
- Whisk your egg whites and sugar in a heatproof bowl over simmering water, stirring constantly until the mixture reaches 160°F and feels warm to the touch. This step pasteurizes the eggs and dissolves the sugar completely, about five minutes of constant whisking.
- Whip to stiff peaks:
- Transfer the warm mixture to your stand mixer and beat on high speed until it's thick, glossy, and completely cool to the touch, around eight to ten minutes. The bowl itself should feel cool when you place your hand against it.
- Add the butter slowly:
- Reduce the speed to medium and add butter a few cubes at a time, waiting for each addition to incorporate before adding more. Add the vanilla and salt at the end, and you'll have the most luxurious frosting imaginable.
- Build your cake:
- Place one layer on your serving plate, spread with buttercream, stack the second layer, spread again, then top with the third. Apply a thin crumb coat, chill for 20 minutes to seal in the crumbs, then apply a final smooth layer of buttercream.
- Apply the gold leaf:
- Using your food-safe paintbrush, gently press edible gold leaf onto sections of the frosted cake where it catches the light most beautifully. Work slowly and let the brush do the work rather than your fingers.
- Arrange the flowers:
- Place your edible flowers decoratively across the top and sides of the cake, then add a gold ribbon around the base if you want an extra touch of elegance. Step back and admire what you've created.
 Pin it
 When my friend's mother took a photo of that cake for her social media and tagged me in it, I felt something shift in how I understood what baking could do. It wasn't just about the taste anymore, though the cake was absolutely delicious, but about marking a moment so important that it deserved to be beautiful. That's when I realized this recipe wasn't really about impressing people at all—it was about honoring someone you care about with your time and attention.
Why Room Temperature Matters
I learned this the hard way when I once tried to make this cake with butter straight from the refrigerator, thinking I could speed things up by beating it longer. The cream took forever to come together, the eggs didn't incorporate smoothly, and the final cake was denser than it should have been. Now I pull everything out of the fridge about an hour before I start, and the difference is night and day—the mixing is faster, the emulsion holds better, and the cake rises more evenly. It's one of those small details that feels almost invisible but changes everything about the final result.
Sourcing Edible Flowers and Gold Leaf
Finding truly edible flowers can feel like hunting treasure, but it's worth the effort because not all flowers labeled as edible are actually food-safe. I've started asking the farmer's market vendors directly about their growing practices, and I've discovered that some specialty grocery stores carry pre-packaged edible flowers that come with certifications. Gold leaf is usually easier to find in baking supply stores or online, but make sure you're buying food-grade gold and not the decorative kind, because that distinction actually matters when it's going in people's mouths.
Customizing for Your Celebration
This cake design works beautifully for graduations, but I've also made it for weddings, milestone birthdays, and even a retirement party where the person loved quiet elegance over anything flashy. You can adjust the colors of your flowers to match a school's colors or a favorite palette, and the gold leaf looks equally stunning in smaller accents or in generous swaths across the entire top. If chocolate sounds more aligned with someone's taste, simply substitute half a cup of the all-purpose flour with cocoa powder and proceed as written, and everything else stays exactly the same.
- Pair the finished cake with sparkling wine or a light fruit punch for a celebration-worthy dessert course.
- Edible flowers will wilt slightly as they sit, so apply them no more than a few hours before serving for maximum visual impact.
- This cake stays fresh for three days in an airtight container at room temperature, or you can freeze it for up to a month before frosting and decorating.
 Pin it
 There's something deeply satisfying about creating something beautiful that gets shared and remembered and talked about long after the last crumb disappears. This cake does that work for you.
Recipe Questions & Answers
- → What type of flowers can be used for decoration?
Use only edible flowers labeled safe for consumption and free of pesticides such as pansies, violets, and roses.
- → How is the Swiss meringue buttercream prepared?
Egg whites and sugar are heated over simmering water until sugar dissolves, then whipped until stiff peaks form before adding butter, vanilla, and salt.
- → Can this cake be modified for chocolate flavor?
Yes, substitute 1/2 cup of flour with cocoa powder to create a chocolate variation.
- → What is the best way to apply the gold leaf?
Use a food-safe paintbrush to carefully place the delicate gold leaf sheets onto the cooled cake surface.
- → How long does the baking process take?
Bake the sponge layers for 28 to 32 minutes at 350°F (175°C) until a toothpick comes out clean.